Does this tutorial help you out? Please comment and let me know what you think!! I would really appreciate it!!!
Wednesday, December 31, 2008
Adobe Illustrator Broken Text Video Tutorial
Does this tutorial help you out? Please comment and let me know what you think!! I would really appreciate it!!!
Monday, December 29, 2008
Awesome Artist!
Sunday, December 28, 2008
Stroke and Fill
This is a very basic tutorial about Stroke and Fill.
Labels:
illustrator basics,
Stroke and Fill,
Video Tutorial
Friday, December 26, 2008
Wednesday, December 24, 2008
Bamboo Tablet Reviewed
 I totally recommend this awesome product!!! I purchased it about a month ago, and now I use it all the time for any artwork that I create. This thing works awesome with Adobe Illustrator!! It comes with a battery free mouse and battery free, pressure sensitive stylus (pen) that is really comfortable and feels natural and intuitive when you use it.
Bamboo Fun
Not only is it awesome with Adobe Illustrator, but it comes with other software. Check it out!!
- Adobe® Photoshop® Elements (5.0 WIN / 4.0 MAC) for editing, retouching, enhancing, organizing, and sharing digital photos
- Corel® Painter™ Essentials 3.0 for creating natural media art and turning photos into paintings
- Nik® Color Efex™ Pro 2.0 GE for selectively applying lighting and photo enhancements with the pen
The Bamboo Fun (Small) Black Tablet with Pen, Mouse & Graphics Software
Product Dimensions: 8.4 x 7.6 x 0.5 inches ; 12.3 ounces
The active area is 5.8" W x 3.7" D
The Bamboo Fun (Medium) Black Tablet with Pen, Mouse & Graphics Software
Product Dimensions: 9.2 x 11.1 x 0.5 inches ; 1.5 pounds
The active area is 8.5" W x 5.3" D
If you have any comments or questions, please post them. If you already have one of these, or you decide to purchase one, let me know what you think.
Top 5 places to download FREE VECTORS!

If your looking for some inspiration, check out these awesome places to download free vectors! Everyone loves something for free, right? You are really gonna love this stuff. Not only will you be inspired, but you'll want to use some of this stuff in your own creations! Just be sure and check out the licensing, so you don't infringe upon anyone else's rights.
1. FREEVECTORS.NET
FreeVectors.net was developed in 2007 with the intent of creating an easily searchable index/catalogue of free to use vector graphics.
2. VECTEEZY.COM
Vecteezy is an index of Free Vector Graphics available for download by some of the best artists around the world. The site is updated every day, so be sure to check back often.
3. VECTOR4FREE.COM
Vector4free.com is a web site dedicated to free vector graphics: Adobe Illustrator AI, EPS, PDF, SVG, Corel Draw CDR files free to download - that's what you can find here.
4. FREE-VECTORS.COM
Our FREE VECTORS may be used for your own DESIGNS, or your client designs but you may not sell/offer for free our VECTORS in any sort of collection, such as distributing to a third party via CD, diskette, or letting others to download them from your websites etc.
5. QVECTORS.COM
Q for Quality. that's our main objective, by showcasing only quality vector graphics for free download.
All of these places are really cool, and have different content on them. You can even submit some of your own vectors.
Please tell me what you think about these sights, and if you know of any sites that give away free vectors, let me know.
Wednesday, December 17, 2008
3D sphere in Adobe Illustrator.

Open up a brand new blank document in Illustrator.
If you don't know how, then follow this tutorial here.
In the Tools Panel, the 8th tool down is called the Rectangle Tool.
 We obviously don't wanna use that, cuz what we're making is ROUND!
 Still holding the left mouse button down, move your cursor over the Ellipse Tool and release the mouse.
Now the Tools Panel should look like this.

Next, we are gonna create the basis for our sphere. What do we start out with? Yup! You guessed it, a circle!
Here's what you get.

What's a gradient?
A gradient is a color that transitions from light to dark, or, from one color to another smoooothly.
Look to the right side of your screen at the Swatches Panel.
Specifically, the very first swatch in the fourth row down.
The little square that goes from white to black.

If you hold your mouse over it, it will say Linear Gradient 1.
Click on that and now the circle you made will be filled with a gradient


When the rotate menu pops up, type in -45 then click on the OK button.


When the drop shadow menu pops up, click OK and now you have your finished sphere.

Did you find this tutorial helpful? Do you have any comment or questions? I would love to hear from you, so click on one of the links below!!
Tuesday, December 16, 2008
Use Adobe Illustrator's Live Trace to turn your photographs into vectors.
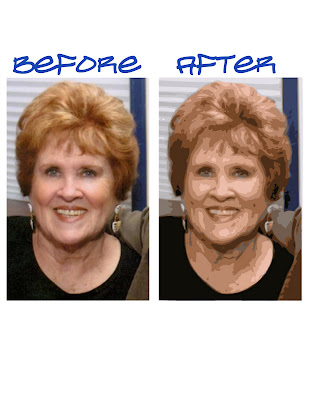 Check out this tutorial to learn about vectors.
Do ya wanna quick way to turn your bitmaps into vectors quick and easy?
Use the Live Trace feature in Adobe Illustrator.
It's so cool!! Here's how.
First, open up a blank document, just like I showed you in this tutorial.
Click on "File" in the menu bar so you get your drop down menu, just like this.

Click on "Place" and go through the menu to find the photograph that you want to vectorize.
Double click on that and it shows up in the middle of your blank document.
I used a picture of my mom. LOVE YA MOM!!

The little boxes are called "anchor points," and those are used to rezise the image.
To resize the image and keep it in the correct perspective, you have to hold down the shift key, and hover the mouse over one of the anchor points until the mouse cursor becomes two arrows pointing in opposite directions, then hold down the right mouse key, and move the mouse away from your picture.
Right below the "Menu Bar," which we talked about in this tutorial , is the "Control Panel." The Control Panel is where all the magic happens. It's where you can customize all of your settings.
There are four big buttons in the "Menu Bar." The "Embed" button, the "Edit Original" button, the "Live Trace" button, and the "Mask" button.
We are just gonna look at the tiny button to the right of the "Live Trace" button. Do you see the little button with the down arrow on it? This is the "tracing presets and options" button. If you click on it, you will see this menu.
 For this tutorial, we are gonna click on the "Color 16" preset. Here's what happens to your photo.
 If you don't like the results, you can either go up to the menu bar, click "Edit'"-"Undo Make Tracing," or hold down CTRL+Z to undo what you just did.
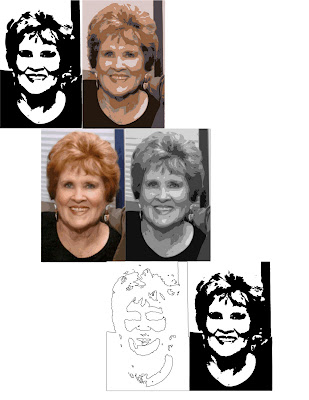
Mess around with the Live Trace presets and try "Comic Art," or "Grayscale." Have fun and remember, you can always hold down CTRL+Z to undo your last action. You can even press CTRL+Z multiple times to undo multiple actions.
Here's what several of the Live Trace presets look like. Remember, experiment and practice! But mostly, HAVE FUN!!
Did you like this tutorial? Did you learn anything? Drop me a comment, or email me to tell me what you think.
Friday, December 12, 2008
Create a Brand Spankin' New Document with Adobe Illustrator
This Adobe Illustrator tutorial is gonna teach you how to make a brand new document, super quick and super easy!
I am running Adobe Illustrator CS3 on a PC, so if you have a different version of Illustrator, or, you are using a Mac, things are gonna look a wee bit different, but its gonna work pretty much the same way.

The main thing that you notice is that big square in the middle of the screen. I like to call that the "getting started menu." There are tons of neat things that you can do with it, but your gonna learn that stuff a little later on. Check back for posts on that subject in the future!!
To start out, we are gonna go right to the bar that's at the top of the screen. You know, this bar with all the words on it.

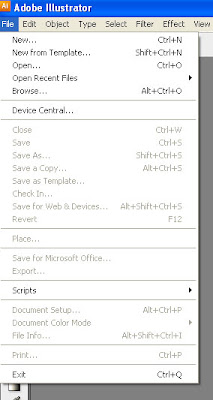
This is called the Menu Bar and this thingy organizes all of your awesome Illustrator commands. What we are gonna focus on right now is the "File" menu. Click on "File" and your gonna see this menu.
Note to self...
There sure are a lot of words there, huh? But do you notice how most of them are kinda faded looking? That's because they are inactive, and you can't click on them yet.
The very top word under the"File" menu, the one that says "New," click on that and you'll bring up the "New Document" window.
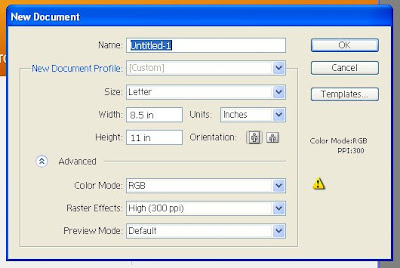
This menu has all kinds of stuff. Do you see the little blue arrows that are pointing down that live inside the little boxes on the right? These are called drop down menus, and if you click on one, it will give you different options. Click on the arrow to the right of the word "Size," and you'll see this happen.
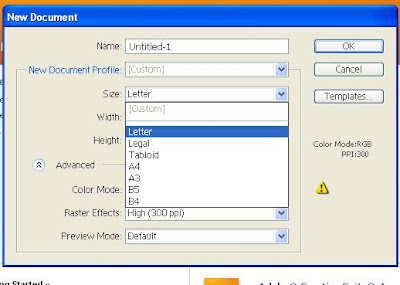
These are standard predetermined sizes. Personally, I like to select the "Letter" size, just cuz' it's the size of a standard piece of paper. You know, paper that you would use in a printer.Click on "Letter" and then go up to the top right side of the new document window and click on the box with "OK" in it. You should now see this.
Now I know your excited, and you wanna get to some designing, but this tutorial is just about opening a file. Your just gonna have to wait for the next tutorial, or you can just mess around and click on stuff. Have FUN!!
I am running Adobe Illustrator CS3 on a PC, so if you have a different version of Illustrator, or, you are using a Mac, things are gonna look a wee bit different, but its gonna work pretty much the same way.
Here's what your gonna see when you first fire up Illustrator.

The main thing that you notice is that big square in the middle of the screen. I like to call that the "getting started menu." There are tons of neat things that you can do with it, but your gonna learn that stuff a little later on. Check back for posts on that subject in the future!!
For now...
To start out, we are gonna go right to the bar that's at the top of the screen.


These are standard predetermined sizes. Personally, I like to select the "Letter" size, just cuz' it's the size of a standard piece of paper. You know, paper that you would use in a printer.
Now I know your excited, and you wanna get to some designing, but this tutorial is just about opening a file. Your just gonna have to wait for the next tutorial, or you can just mess around and click on stuff. Have FUN!!
Saturday, December 6, 2008
What the heck is Adobe Illustrator?
Adobe Illustrator is the industry standard for vector graphics.
I know, I know... your thinking, "What the heck are vector graphics?"
Well check this out. Vector graphics are digital images that use mathematical calculations and computer algorithms to define shapes and lines.
Isn't that awesome?
Do you realize what this means?
Um, no?
That's totally OK, because that's what I'm here for. To help you get past that pain in the neck, Adobe Illustrator learning curve.
Why are vectors so dang cool?
Vectors are awesome because all those calculations and algorithms give you a really crisp and clearly defined graphic that doesn't get all pixelated or fuzzy when you zoom in on it or blow it up really big. That means that you can use the same graphic that you made for a business card, blow it up really super huge, even up to the size of a billboard, and you will still have the exact same quality graphic
You would think that if you had a graphic that was little, and you blew it up really big, that the file size would get bigger. That is just not true with Illustrator, simply because no matter what size your graphic is, it still uses the same mathematical equations.
What kind of stuff can I do with Illustrator?
You can design ANYTHING you want.
You can design, logos, text documents or even cartoons, (have you ever seen South Park, or The Simpsons?)
You can design stuff for video games, and any kind of graphic used on the internet. It's totally ideal for the web because the files are so small compared to other kinds of graphics like jpegs or bitmaps.
When you get really good with Illustrator, you can even make photo realistic art that is so real looking that you literally cannot tell the difference between it and an actual photo.
So quit yer yappin' and post some tutorials already!
OK, I'm on it. You should see your first tutorial within a day or two.
If you have already used Adobe Photoshop, then you've already got one foot in the door. If you never have used Photoshop, no problem. I'll make sure that everyone at every skill level will be able to follow the tutorials in this here blog. If you don't understand something, have any questions or comments, or you would like me to write about something, I would love to hear from you. Just click on my link, or on the comment button below.
Friday, December 5, 2008
Greetings everyone!
Hi everyone! Welcome to Illustrator Made Easy on blogspot.com.
Adobe Illustrator is one of the best design tools around for artists today. While there are many great free online tutorials for the intermediate and advanced users of Illustrator, I realized that there is a limited number of tutorials for the beginner. If you are new to Adobe Illustrator, then this blog is for you! You will learn many cool and fun things about Illustrator in a way that's fun and easy to understand. Let's get started!!
Adobe Illustrator is one of the best design tools around for artists today. While there are many great free online tutorials for the intermediate and advanced users of Illustrator, I realized that there is a limited number of tutorials for the beginner. If you are new to Adobe Illustrator, then this blog is for you! You will learn many cool and fun things about Illustrator in a way that's fun and easy to understand. Let's get started!!
Subscribe to:
Comments (Atom)


